Download Pompeii Map with places to see in this Pompeii self guided walking tour
Use the Pompeii map below to visit the 49 Pompeii attractions, (including 8 gates) at the archaeological park ie: excavation site (Pompeii Scavii). A complete guide to the Pompeii ruins, including houses, theaters, brothels, and churches. Follow the walking route to explore Pompeii Ruins at your own place. Spend a few hours or a full day depending on how long you want to spend at each attraction. Click on the arrow icon to the left of the title to display the legend. Click on the Pompeii map pins (blue and green pins) on the interactive map of the Pompeii ruins below, or on the legend or the PDF map that you download for additional information including images of the attraction
Accompanying Pompeii attractions guide to map of Pompeii is HERE
Download the PDF Pompeii map, CLICK HERE
Zoom in and scroll to bring the Pompeii Map above into view. Click on Pompeii Self Guided Walking Tour route for attractions guide
On the Pompeii map above; click on the arrow icon to the left of the title to display the legend with Pompeii attractions. Click on the map pins (blue and green pins) on the interactive Pompeii map above, or on the legend or on the PDF map that you download for additional information including images and videos of the attraction. To download the Pompeii map in a PDF format, click HERE
Pompeii Self Guided Walking Tour – the route to Visit Pompeii Attractions:
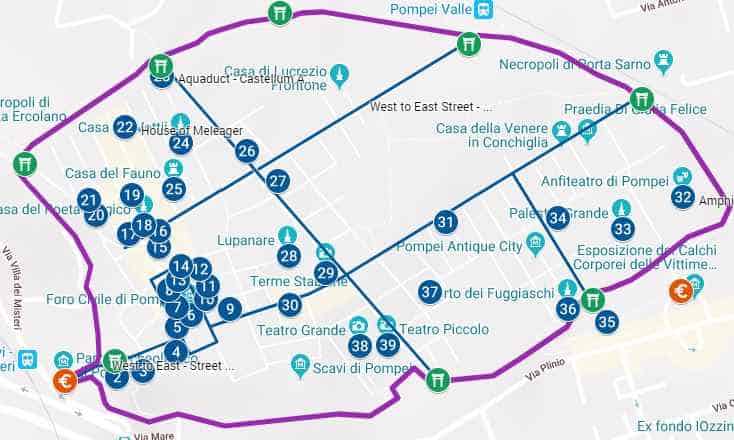
The Pompeii map with approximate boundaries (shown in light purple), Pompeii attractions (shown as dark blue pins) and major routes of the city (shown as blue lines) from north to south and west to east. The Pompeii Gates are the green map pins
The major north to south route starts out as as Via Dei Vesuvio (via=street) at the North near the porto vesevio and becomes Via Stabian as you walk south. The main commercial street is from west to east starting from the west as Via Marina and becomes Via dell’Abbondanza as you walk east. The entire area of Pompeii is broken up into districts (communities) similar to cities today. The regions are divided by roman numerals I to VIII. You will see a plaque when you enter the region with the region number, district number and perhaps the road name. Each of the attractions will also have a plaque outside with the name of the attraction
General Walking Guide: Pompeii Ruins
- From the Pompeii main entrance (ticket office), walk on Via Marina towards porto / gate Marina
- From the Porta Marina (ancient Pompeii entrance from the harbour) continue on Via Marina to walk towards the Roman Forum (Orange Square on the map). Along the way you will see the Temple of Venus on your left and the Basilica right next to the Temple of Venus. Across from the Basilica is the Temple of Apollo, whose entrance is actually from the Forum. Once you have explored these, enter the Forum
- Explore the Forum by walking the west side then the east side:
- On the west side of the Forum:
- Start with the Temple of Apollo on the south side (where you entered the forum); next to it and walking north is a small alcove with a measuring table called Mensa Ponderaria. Mensa Ponderaria is used to measure dry and liquid goods and assign a weight to them. North of it is the Granary. Next to the Granary and continuing north you will see the Pompeii public toilets; you should now be in the northwest corner of the Forum
- On the east side of the Forum:
- Starting at the south and east end of the forum is the Building of Eumachia, north of that is the Temple of Vespasiano; north of that is the Sanctuary of Lari. Next to it and north of the Sanctury of Lari is the public food market Macellum. Across from the Macelleum is the Temple of Jupiter with a view of Mt. Vesuvius 8km to the North
- As you continue to walk north, you will reach the Arc of Nero, which looks like an arched gate. You will now be leaving the Forum and entering the street Via del Foro which turns into Via Dei Mercurio as you keep heading north
- On the west side of the Forum:
- After leaving the Forum and entering Via del Foro, there is a cafeteria and toilet facilities on your left for tourists
- Continue walking north on Via del Foro to explore the Terme del Foro (baths on Foro) which are on your left. After exploring the baths, walk north to explore the Thermopolium (fast food restaurant), the House of Pansa, and the House of the Tragic Poet
- As you continue walking north and westward you will be able to explore the northwest section of the Pompeii ruins including; the House of the Small Fountain, the Bakery – Casa del Forno, the House of Sallust, and walk until you arrive at the Herculaneum Gate
- Then walk east and visit the House Meleager; continue eastward to arrive at Porto Vesuivio and the city aquaduct called Castellum Aquae. These are at the end of Street Via Dei Vesuvio, (orange line on the map running north and south, via=street). Note that as you walk south on Via Dei Vesuvio it turns into Via Stabiana
- Then walk south and slightly westward, one street west of Via Dei Vesuvio to Vicoloa dei Vettii and explore the following houses: the House of Vettii and the House of Faun. From the House of Faun walk east towards the main route Via Stabiana to the House of Lucius Caecilius Iucundus Domus. A youtube 3D animated recreation of the house is available from the link on the pdf map
- Continue walking south on via Stabiana towards the Terme central baths (smaller baths), the brothel (Lupanar) and the larger Terme Stabiane baths. After visiting the baths, walk south to the main street Via dell’Abbondanza and walk west on Via dell’Abbondanza to the House of the Physician. The House of the Physician is west of the Terme Stabiane on the Street Via dell’Abbondanza
- Via dell’Abbondanza is a major commercial street that runs west from Porto Marina to east toward Porto Sarno (leads to Sarno River). The corner of Via Stabiana and Via dell’Abbondanza is a major intersection
- After visiting the House of the Physician, walk east on Via dell’Abbondanza to explore the southeast section of Pompeii. This includes the House and Thermopolium of Vetutius Placidus (larger tavern/pub), the Amphitheater (Gladiator Games) and the Palestra (Gym)
- From the Palestra, head south on Via di Nocera towards the Triclinium Gardens (garden and outdoor dining), the garden of the fugitives (outdoor garden), porto / gate Nocera and the cemetery Necropli just outside porto Nocera
- From porto Nocera walk west towards the southwest section of Pompeii to explore the following attractions; the House of Menander, the large and small theaters (Teatro Grande and Teatro Picolo)
- Walk back up to Via dell’Abbondanza; then walk west back to the main gate Porto Marina
Other Attractions in Italy
- Visit the Roman Colosseum. Click on the Roman Colosseum attractions map HERE and accompanying Colosseum attractions guide HERE
- Take the Rome attractions map and self guided tour: It includes the Vatican City attractions map HERE and the Vatican attractions guide HERE
- Self Guided Walking tour to explore the neighborhood of Trastevere with map of attractions HERE and guide of attractions HERE
- Visit St Peters Basilica. Explore all the attractions in St Peter’s Basilica with the attractions guide HERE
- One of my favorite places is the Roman Forum and Palatine Hill. The map of attractions is HERE and the self guided walking tour is HERE
- Self Guided Walking Tours – Day Trips from Rome
Instructions to download the interactive map to a smart phone:
Take the Map with you when you travel:
Instructions on:
- Using it offline
- Using it online – We bring one of our older smart phones when we travel and buy a local SIM card. You can purchase a local tourist SIM card from one of the main local providers, they are usually pretty inexpensive. You may need your passport to purchase as its a tourist SIM if you are an international tourist. You should have them put it in your old smartphone and check that it works before leaving the store. Use it to follow the map online, its the best way to explore
Sign into google using your Gmail account on your smart phone and be connected to the internet. If you do not sign in, this process will not work. You will be downloading this map to save it. You will be saving it in google maps in two places:
- Save in “Your Places” for online use and
- Save in “Offline map” for offline use
- Youtube instructions on link as follows:
https://youtu.be/_6j9koieMsU
Instructions to save above map:
- Click on the rectangle on the top right hand side of the above map [ ] – if you move your mouse to it, it will say “view larger map”
- It will take you into google maps on your smartphone and it will automatically save this map. You must be already be signed into google maps with your Gmail account, if you are not signed into google maps then the map will not be saved
- In google maps, click on the menu which is the three horizontal lines on the top left of the google map (it is to the left of the search box)
- From the menu, click on “Your Places”. This will take you to another screen with a menu at the top. From the top menu bar select “maps”. A list of your maps will be displayed including the map that was just saved. Select the map you just saved
- Make sure the map is still onscreen; do not close out of it as you will be downloading this map and it has to be onscreen to download. While the map is onscreen, click on menu again (three horizontal lines top left hand corner)
- Select “Offline maps” then select “custom map”
- Once you select “custom map”, the onscreen map will be displayed; select the area you want downloaded (zoom in or out to get all the data points into the blue square outline; pinch fingers for zooming)
- Click on “download” – this will save the map in an offline area that you can use when you are not connected to the internet
The map is now saved in two places. To see this, click on the menu (three horizontal line on top right hand corner) in google maps:
- Click on “Your Places” from the menu, then select “Custom Map”. The map will be listed and you can use the map while connected to the internet
- Click on “Offline Maps” from the menu. The map will be listed to use the map offline ie: not connected to the internet (make sure location services is turned on and your will see the blue dot indicating your location as you navigate with the offline map)
- After you download a map, use the Google Maps app just like you normally would. If your Internet connection is slow or absent, or if you are in “airplane mode” Google Maps will automatically use your offline maps to give you directions